

 By
Your tire went soft a mile ago, and now the rim is clunking along the road. Take a breath. Here’s how to fix a flat tire on a bike: you take the wheel out, take the tire off, find what caused the problem, fit a patched or new tube, and put everything back.
The part that separates a quick fix from a repeat flat is finding the cause. I’ve been riding for about two decades, and I still treat that step as the one that matters most.
This guide covers rim and disc brakes, quick release and thru axles, and the common valve types. Follow the order and you’ll be rolling again.
Quick Takeaways:
- Find and remove what caused the flat before you fit a tube, or the new tube can fail straight away.
- Replace the tube on the roadside and patch the old one at home, since replacement is the safest and most reliable repair according to Park Tool.
- On hydraulic disc brakes, don’t squeeze the brake lever while the wheel is out. The pads can close and block the wheel from going back in.
- Seat the tire bead with your hands, and use a lever only as a last resort. Levers are how most new tubes get pinched.
- Do the whole job once at home before you need it on the road.
What You Need Before You Fix a Flat Tire on a Bike
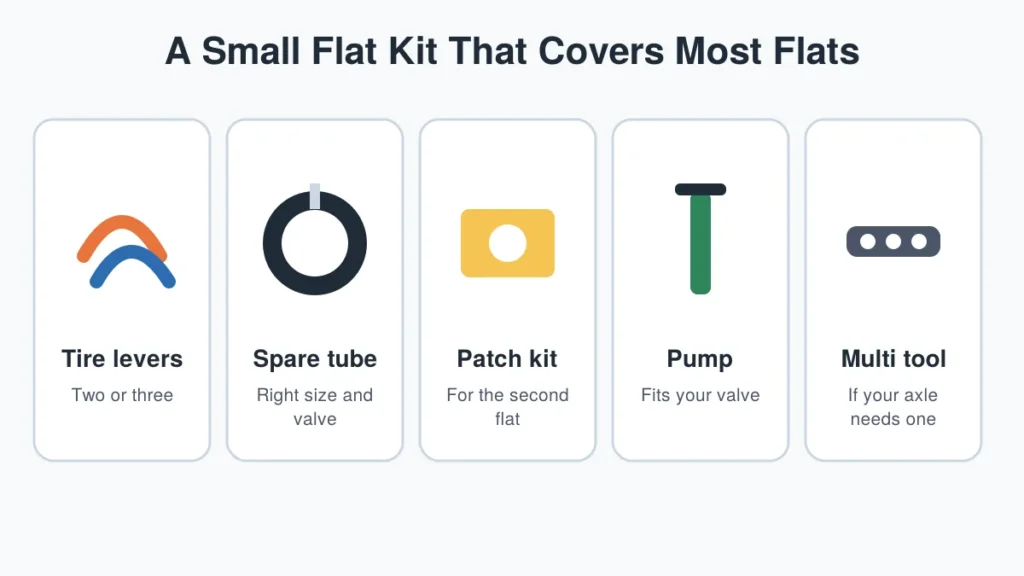
A flat on the road is a bad time to find out what’s missing. Here’s what I carry, and why.
- Tire levers, two of them. Getting the tire bead over the rim usually takes them, and the brand’s own guidance warns against screwdrivers and knives, which can damage the tire or tube.
- Spare tube. Match your tire size and valve type.
- Pump. It has to fit your valve, and a hand pump or a CO2 inflator both work.
- Patch kit. It earns its place on the second flat of the day, which I’ll explain later.
- Multi tool. Only needed if your wheel needs one to open.
Most of this fits in a small saddle bag.
Valve Types You’ll Meet
Check which valve your tubes use before you buy a pump head or a spare tube. There are three common types.
- Presta: thin, about 6 mm, with a small locknut at the tip that you unscrew before air goes in or out.
- Schrader: wider, about 8 mm, like a car tire valve, with a spring plunger inside.
- Woods (also called Dunlop): the third type, with its own pump fitting.
Presta is common on mid- and higher-priced road and mountain bikes. Test your pump on your valve at home, not on the roadside.
Read: How To Start Cycling As A Complete Beginner: Simple Steps
Step 1 and 2: Get Safe, Then Remove the Wheel
Pull well off the road before you do anything else. Take off a saddle bag or bike computer if it’s in your way.
Set Up the Bike
If you’re removing the rear wheel, lay the bike on its left side, the one without the chain and gears. Standing the bike upright without the rear wheel can damage the rear derailleur.
Remove a Front Wheel
- If you have rim brakes, open the brake release so the pads spread apart. Disc brakes need no release.
- Open the quick release lever or unscrew the thru axle. Some thru axles need a special fitting engaged first, and others are simple levers.
- If your wheel has axle nuts instead, loosen both with the right wrench.
- Guide the wheel down and out of the fork.
Remove a Rear Wheel
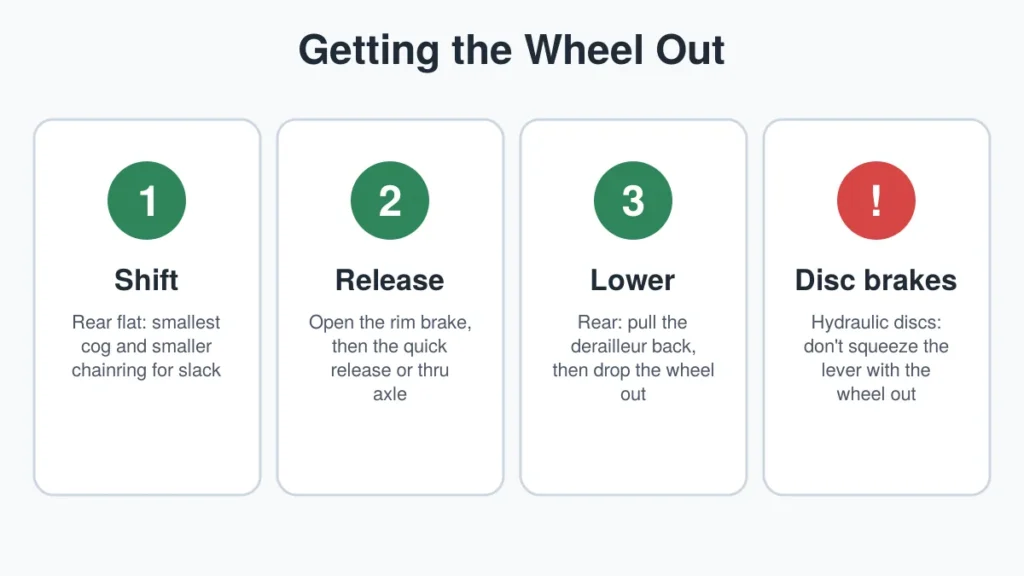
- Shift to the smallest rear cog and the smallest front chainring. That gives the chain the most slack.
- Open the brake release if you have rim brakes, then open the quick release or thru axle.
- Pull the rear derailleur back, lower the wheel down through the brake pads, then forward to clear the chain.
Release a Clutch Derailleur Before Pulling the Wheel
Some rear derailleurs have a clutch that resists moving. On SRAM models, move the lower pulley forward and lock it with the button. On Shimano models, flip the on and off lever to off.
Disc Brakes: Don’t Squeeze the Lever
With hydraulic disc brakes, don’t squeeze the brake lever while the wheel is out. The pads can close, and getting the wheel back in becomes a struggle. A purpose built pad spreader solves it.
I learned that one the hard way, with a borrowed pad spreader and a lot of muttering.
Step 3: Take the Tire Off the Rim
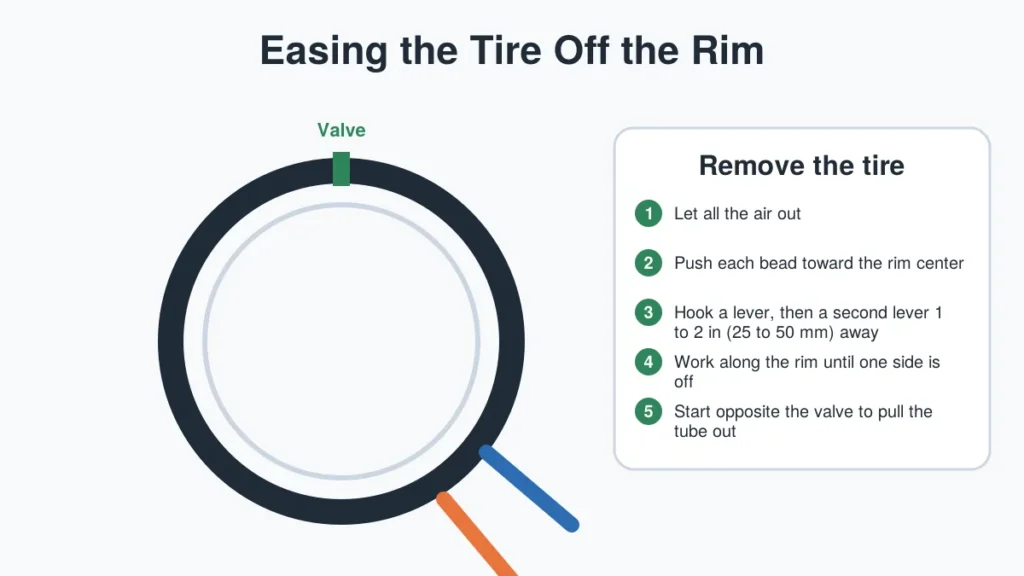
Most bikes use a clincher tire. It has a bead along its inner edge that sits snugly in the rim.
- Let all the air out. On a Presta valve, unscrew the locknut first and press the tip. Leftover air makes removal harder.
- Push each bead toward the center of the rim to loosen it.
- Hook one lever under the bead. Hook a second lever 1 to 2 in (25 to 50 mm) away, then pull both toward the spokes.
- Move one lever along the rim and repeat until one side of the tire comes loose.
- Starting opposite the valve, pull the tube out of the tire. Lift the valve out of its hole.
- Take the second bead off the rim so the tire is fully free.
Take the tire off completely to inspect it. It costs a minute, and it has saved me from more than one repeat flat.
Step 4: Find What Caused the Flat
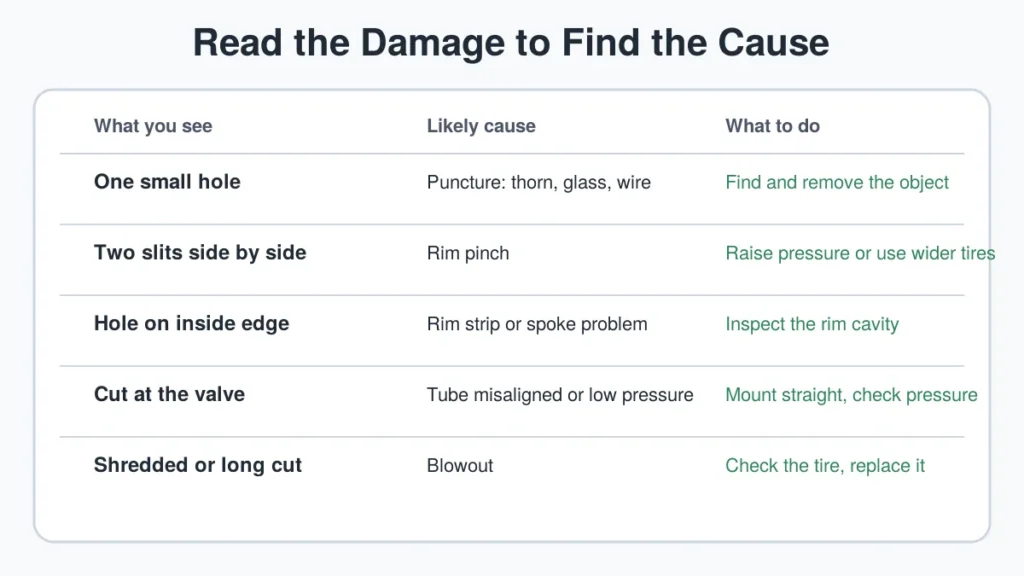
This is the step people rush. The flat is only a symptom, and whatever caused it, whether that’s a thorn, a sliver of glass, or a worn rim strip, may still be sitting in your tire waiting for the new tube.
On one ride I swapped the tube, pumped up, and heard a hiss within a minute. A thorn tip had broken off inside the tire. Running a rag along the inside found it.
Locate the Hole in the Tube
Inflate the tube to about twice its normal width if you can. Hold it near your lips or ear and move it around, feeling and listening for air. If that fails, dunk it in water and watch for bubbles.
Mark the hole with four marks around it, not right beside it. Sanding can remove a mark that’s too close.
Check the Tire and Rim
Check both the tire and the rim, inside and out.
- Tread: look for nails, glass, and thorns. Squeeze any cut to see inside it.
- Inside the casing: wipe it with a rag, then feel carefully with your fingers.
- Sidewall and bead: look for rips, holes, or damaged rubber.
- Rim strip: it covers the spoke holes. Check for tears, that it’s centered, and for any sharp spoke ends.
What the Hole Tells You
I read three clues: what the damage looks like, where it sits, and whether there’s one hole or two. Here’s my quick reference
| What You See | Likely Cause | What to Do |
|---|---|---|
| One small hole | Puncture from a thorn, wire, or small nail | Find and remove the object |
| Two slits side by side | Rim pinch | Raise pressure or use wider tires |
| Hole on the inside edge | Rim strip failure or a sharp spoke end | Inspect inside the rim |
| Cut at the valve | Tube misaligned or low pressure | Mount the tube straight, check pressure before rides |
| Shredded hole or long cut | Blowout | Check the tire and rim, replace the tire if damaged |
A pinch flat usually means low pressure, so the fix is air, not a new tire.
Step 5: Patch the Tube or Replace It?
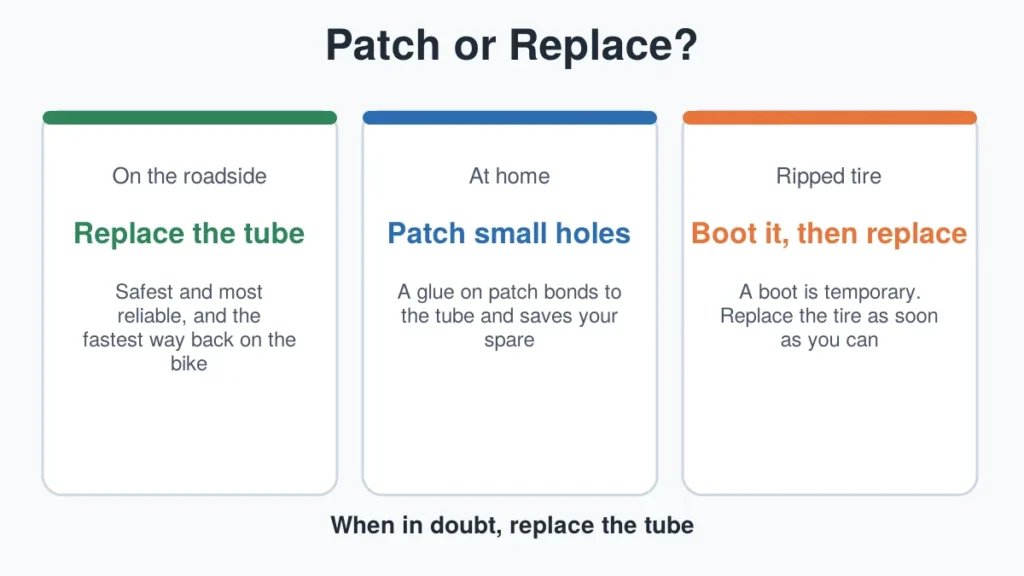
My rule is simple. Replace the tube on the roadside, and patch the old one at home. Replacing the tube is always the safest and most reliable procedure, and when in doubt you replace it.
Glue needs time and clean conditions. A fresh tube takes seconds, and the old one becomes a kitchen table job that rebuilds your spare.
Replace the Tube
Fit a tube that matches your tire size and valve type, then skip ahead to step 6.
Patch the Tube at Home
A glue on vulcanizing patch is more work than a pre-glued one, it’s much more durable because it bonds chemically to the tube.
- Sand lightly around the hole. Heavy sanding can cut grooves and make the patch fail.
- Clean the area with a rag and alcohol, or a solvent that leaves no film. Let it dry.
- Spread a thin, even coat of glue, slightly larger than the patch.
- Let the glue dry for several minutes. Test by touching only its outer edge.
- Peel the patch, handling it by the edges, and center it over the hole.
- Press firmly, especially at the edges, for over a minute if you can.
- Leave the clear cover on the patch. If it comes off, dust the patch with talc or baby powder.
Pre-Glued Patches Are a Backup
Pre-glued patches are quick, but a temporary trailside fix and replace the tube as soon as possible. I keep a few for the second flat, not the first.
Don’t test a patch by inflating the tube outside the tire. It can stretch the tube and weaken the bond.
Step 6: Put the Tire Back On Without Pinching the Tube
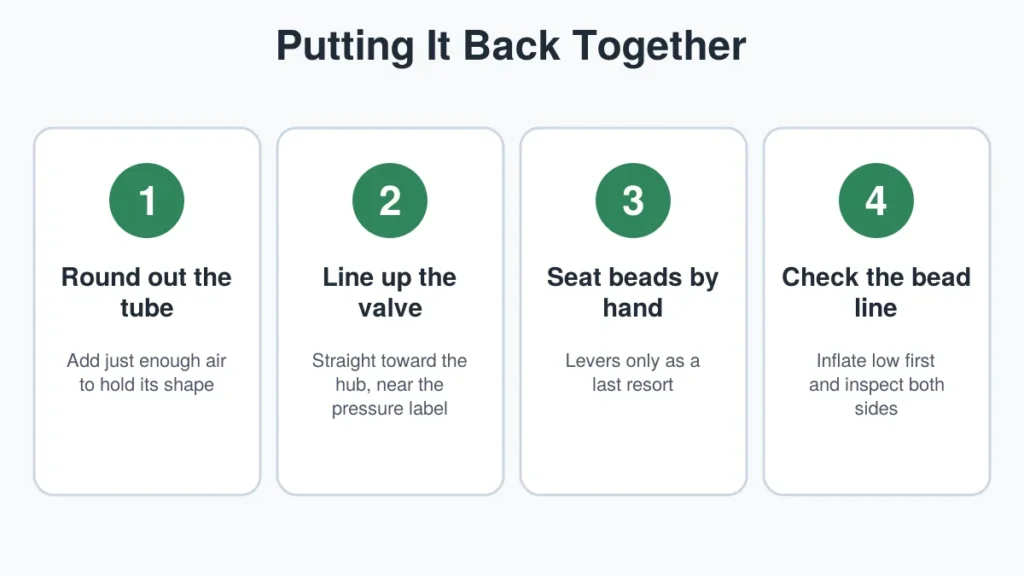
This is where I pinched my first replacement tube. I reached for a lever, caught the tube under it, and had to start over.
- Look for directional arrows on the tire sidewall. They show the wheel’s rotation, and not every tire has them.
- Add just enough air to the tube so it holds its shape.
- Place the tube in the tire with the valve beside the pressure markings on the sidewall.
- Drop the valve through the rim hole so it points straight toward the hub. A crooked valve can lead to a flat later.
- Seat one bead at a time with your hands. Use a lever only as a last resort, and take care not to catch the tube.
- Check both sides of the tire for any tube sticking out from under the bead.
Step 7: Inflate, Refit the Wheel, and Do a Final Check
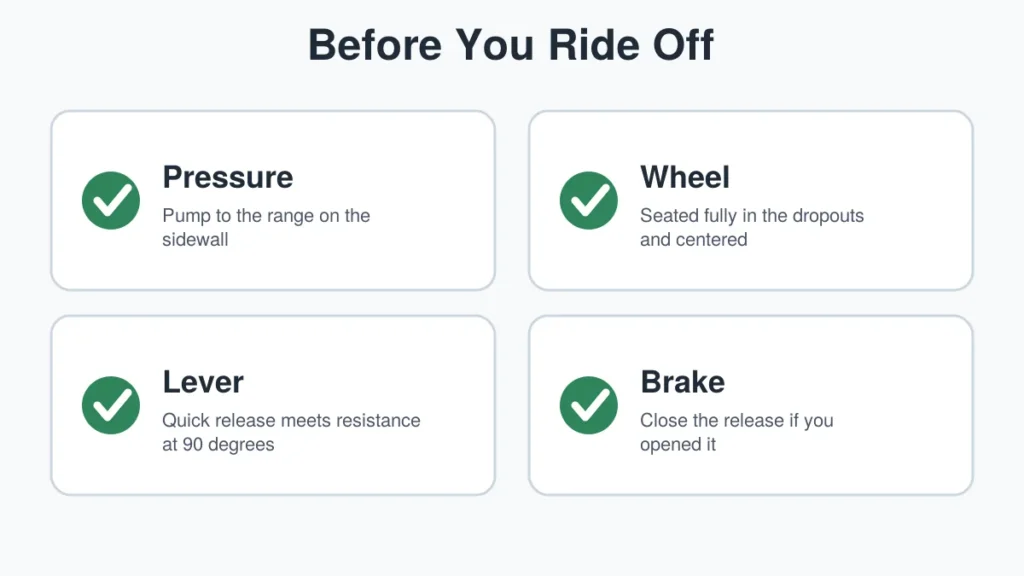
You’re nearly done, and these last checks matter more than the repair itself, because a wheel that isn’t seated properly is a bigger problem than the flat you just fixed.
Inflate in Two Stages
Inflate to low pressure first and look at both sides of the tire. A small molding line sits just above the bead, and it should run evenly around the rim. If it bulges or dips, let the air out and reseat the tire.
Then inflate to the pressure range printed on the sidewall. Check it with a gauge if you have one. Refit a Presta locknut finger tight, with no wrench or pliers.
Refit the Wheel
- Open the brake release and the quick release, if you have them.
- Seat the hub fully in the dropouts. On a rear wheel, pivot the derailleur back and slot the smallest cog between the upper and lower chain.
- Tighten a quick release until the lever meets resistance at 90 degrees from the frame or fork. On a thru axle, turn it clockwise until tight.
- Close the brake release again.
- Check that the wheel sits centered in the frame or fork.
On disc brake bikes it’s especially critical that the skewer is fully secure, because the braking load pushes the axle outward. If you’re unsure about wheel security, ride gently and ask a shop to check it.
Why Your Flat Keeps Coming Back
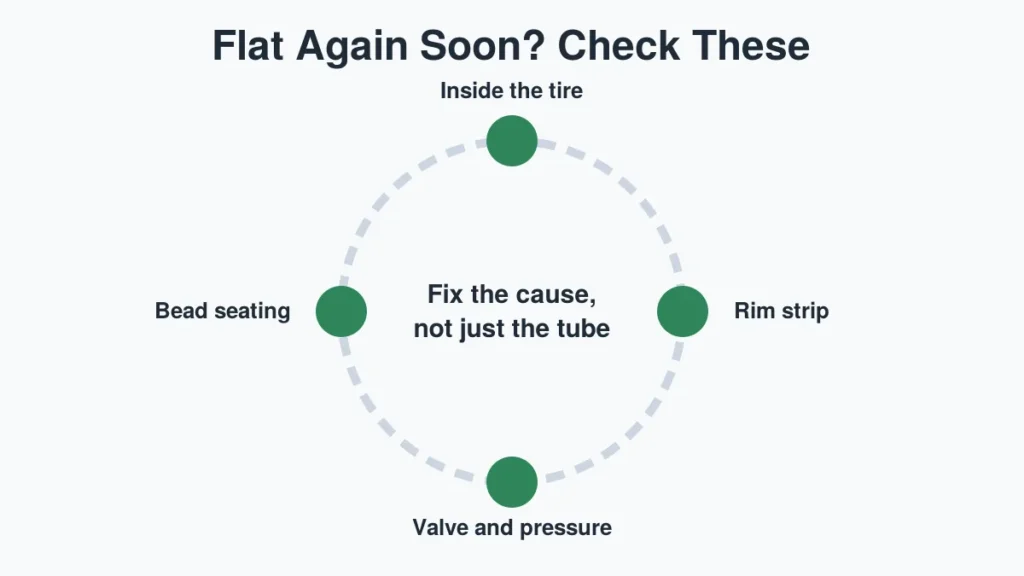
If a new tube goes flat quickly, the cause is usually still there. Work through this list before you buy another tube.
- Something sharp is still in the tire. Wipe the inside and feel again, slowly.
- The rim strip is damaged or a spoke end pokes through. That shows up as a hole on the inside edge of the tube.
- The tire runs too low on air. Check pressure before rides. For rim pinches, the usual fixes are more pressure or wider tires.
- The valve sits crooked. Reseat it so it points toward the hub.
- The tire casing is damaged. If the sidewall or bead is hurt, replace the tire.
Picture a ride 10 miles (16 km) from home. You replace the tube, and four miles later you hit something sharp. If your only repair was a spare tube, you’re walking. That’s why I carry patches as well.
FAQs About How to Fix a Flat Tire on a Bike
How do I pick the right replacement tube?
Read the size printed on your tire sidewall and buy a tube whose size range covers it. Match the valve type to your rim’s valve hole. Deeper rims need longer valve stems, so check the valve length on the tube before you buy.
Can I patch a tubeless tire?
Stick-on patches don’t work on tubeless tire bodies, so a plug tool for tubeless repairs is recommended. Practice with the tool at home before you need it, since the first attempt shouldn’t be on a roadside, and ask a shop about damage a plug can’t close.
What if the tire itself is ripped?
A tire boot can make a temporary repair. It must completely overlap the rip and sit inside the casing without extending past the bead. A booted tire isn’t a permanent repair, so replace the tire as soon as you can.
What if the tire bead won’t seat on the rim?
Inflate to low pressure and check the bead line on both sides. If the bead stays stuck below the rim, Park Tool suggests soapy water as a lubricant. Don’t use grease or oil. Deflate and reseat if the line bulges.
What if I forgot my tire levers?
Push both beads toward the center of the rim, which loosens them. Some tires may then come off by hand. Screwdrivers and knives are a bad idea, because they can damage the tire or tube. If the tire won’t budge, call for a ride
My Advice: Do It Once in Your Kitchen
As a kid, a flat meant walking my little red bike home from the community ground and hoping someone older would show me. My first self-fixed flat took far longer than it should have, because I was working out every step on the roadside.
So here’s my one piece of advice. Take an old tube or a spare, remove the wheel, take the tire off, and put it all back, at a table with good light. Do it once before you need it.
When the real flat comes, you’ll already know where your hands go.
Written by: Raaz | Writer at TheMileRider. Learned to ride late, has spent about two decades on road, mountain, and everything between, and now writes about everything from first rides to brake pad wear limits.
3 Comments